Showing posts with label crochet. Show all posts
Monday
Crochet sunflower coaster pattern
Hello everyone!
Do you wish to dress up your table with coasters? Here is a funny and easy crochet motif that you can use as coasters to get your table looks. And you can find the written instructions HERE. Download patterns and start crocheting right away! .
I love the simplicity of crocheting this crochet motif; after crocheting one you can basically do them without reading the instructions.
Some time ago I posted this pattern of crochet coasters, and in my statistics I could see that it has been the most favourite pattern on my blog for some time. So that's why I designed a new pattern that's just as easy, and perhaps a bit prettier also. You can find the pattern below.
This is my most popular coaster, click on the picture.
Tuesday
How to Crochet Bag Easy Market Tote - Stitches Ideas
If you are after practical and effortless projects, today`s collection of crochet patterns for Easy Market Bags is just for you.
For the grocery store, farmer’s market, or even beach – these cotton mesh bags are incredibly useful, expandable, and durable.
They are reusable, durable, and ready to keep all your groceries safe. Plus they take up virtually no space when empty. The net bags can easily fit in your purse or pocket but they are stylish enough to act as handbags too.
AND they’re super easy to crochet.
Monday
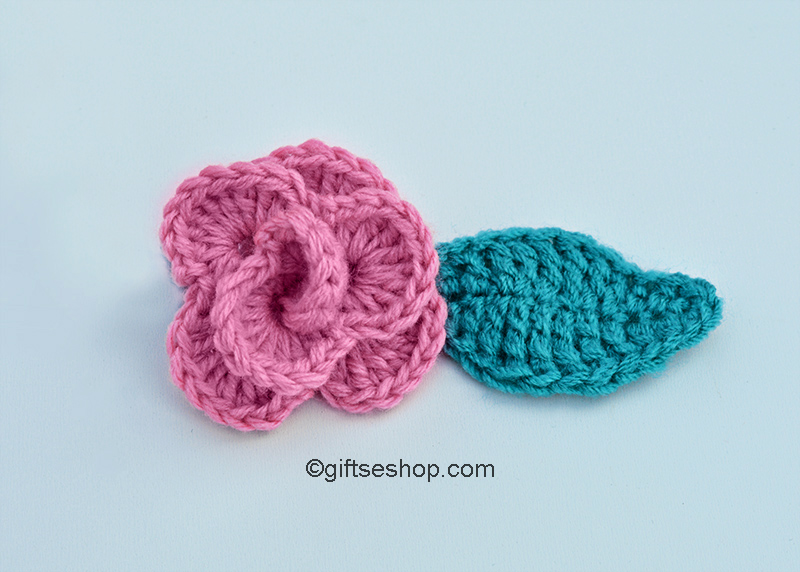
Easy Crochet Flower Little Rose Tutorial
Make your own crochet flowers with any yarn from your stash the matching crochet hook. A quick easy pattern ideal for every crocheter.
Flowers will look great on your clothes as an applique; it’s good for card making, sewing, embellishments, jewelry making, scrapbooking.
This crochet rose flower was made with Hook size 4mm.
Sunday
Easy to Crochet Lace Ribbon Band
This easy crochet ribbon cord for beginners. This beautiful lacy crochet pattern is great as a headband, bookmark , home decoration (for holding an open curtain), or use it as a part of a lace project. It is the perfect accessory for any occasion, especially for upcoming summer season.
Monday
Jar Lid Covers Crochet Free Pattern - Home Decor
I appreciate you sticking around and following my patterns right here on the blog. When you stay here to follow patterns, I am compensated for my time and energy. This is a great, free way to support a designer. Thank you for helping me keep this blog alive so I can keep writing awesome free patterns for you to enjoy.
The beginning of the school year always comes with canning jam.
Autumn is the season when trees are laden with delicious fruits and berries.
I always take a little time to make some homemade strawberry jam. If you’ve never canned before, I can highly recommend it. This year, I decided to also make a little strawberry jar cover so I can also use the jam for gifts later in the year.
Skill level: easy / beginners
Hook: Made with 3.25mm/D3 hook, or size needed to obtain gauge.
Tapestry needle
Yarn: Weight- #3, DK, Light Worsted 100% cotton
Gauge: Rnds 1-5 = 2”
Crochet Terms used in this pattern: US
Download a pattern here
The beginning of the school year always comes with canning jam.
Autumn is the season when trees are laden with delicious fruits and berries.
I always take a little time to make some homemade strawberry jam. If you’ve never canned before, I can highly recommend it. This year, I decided to also make a little strawberry jar cover so I can also use the jam for gifts later in the year.
Skill level: easy / beginners
Hook: Made with 3.25mm/D3 hook, or size needed to obtain gauge.
Tapestry needle
Yarn: Weight- #3, DK, Light Worsted 100% cotton
Gauge: Rnds 1-5 = 2”
Crochet Terms used in this pattern: US
Download a pattern here
Tuesday
Crochet Coasters Pattern- Cup or Glass Coasters
I decided to make a few coasters.
This is a lovely easy gift to make and I can see Ill be making more of these in the future.
I think you will love them if you keep these for yourself or if you decide to give the set as a gift.
You can find the pattern for the coasters by clicking on the link.
This is a lovely easy gift to make and I can see Ill be making more of these in the future.
I think you will love them if you keep these for yourself or if you decide to give the set as a gift.
You can find the pattern for the coasters by clicking on the link.
Sunday
Crochet Crowns Patterns
All my crochet crown patterns. Here you will find links to all my crochet patterns and tutorials.
I try to make my patterns as easy as possible, because I want each and every one of you to be able to use them, regardless of your crochet experience!
If you get stuck with any of my patterns, please contact me so that I can help you figure it out. If you spot an error in one of my patterns, I would be immensely grateful if you could let me know so that I can correct it. My e-mail you will receive when buying a pattern.
All my patterns are written in USA format.
Crochet Crown Pattern- Princess Crown - Princess Tiara - Prince Crown - Photography Props N77
Crochet tiara headband pattern.
Crochet Crown Pattern - Princess or Prince Crown PDF Multiple Sizes no51
Crochet Crown Pattern-Tiara Headband- Crown Headband- Crown Pattern- Crochet Baby Crown Pattern n50
Crochet princess crown pattern.
Crochet Newborn Princess Crown Tiara Pattern PDF N59
Crochet Crown Pattern, Crochet Tiara Pattern, Crochet Crown, Crochet Baby Crown, Prince Crown PDF N72
Crown Pattern Crochet Baby Crown- Crochet Headbands n49
I try to make my patterns as easy as possible, because I want each and every one of you to be able to use them, regardless of your crochet experience!
If you get stuck with any of my patterns, please contact me so that I can help you figure it out. If you spot an error in one of my patterns, I would be immensely grateful if you could let me know so that I can correct it. My e-mail you will receive when buying a pattern.
All my patterns are written in USA format.
Crochet Crown Pattern- Princess Crown - Princess Tiara - Prince Crown - Photography Props N77
Crochet tiara headband pattern.
Crochet Crown Pattern - Princess or Prince Crown PDF Multiple Sizes no51
Crochet Crown Pattern-Tiara Headband- Crown Headband- Crown Pattern- Crochet Baby Crown Pattern n50
Crochet princess crown pattern.
Crochet Newborn Princess Crown Tiara Pattern PDF N59
Crochet Crown Pattern, Crochet Tiara Pattern, Crochet Crown, Crochet Baby Crown, Prince Crown PDF N72
Crochet king crown pattern.
Crochet Pattern - Crochet Crown Pattern - Tiara Crochet Pattern - Baby Girl Princess Costume –- Photo Prop no87Crown Pattern Crochet Baby Crown- Crochet Headbands n49
Saturday
Crochet Stones DIY Ideas
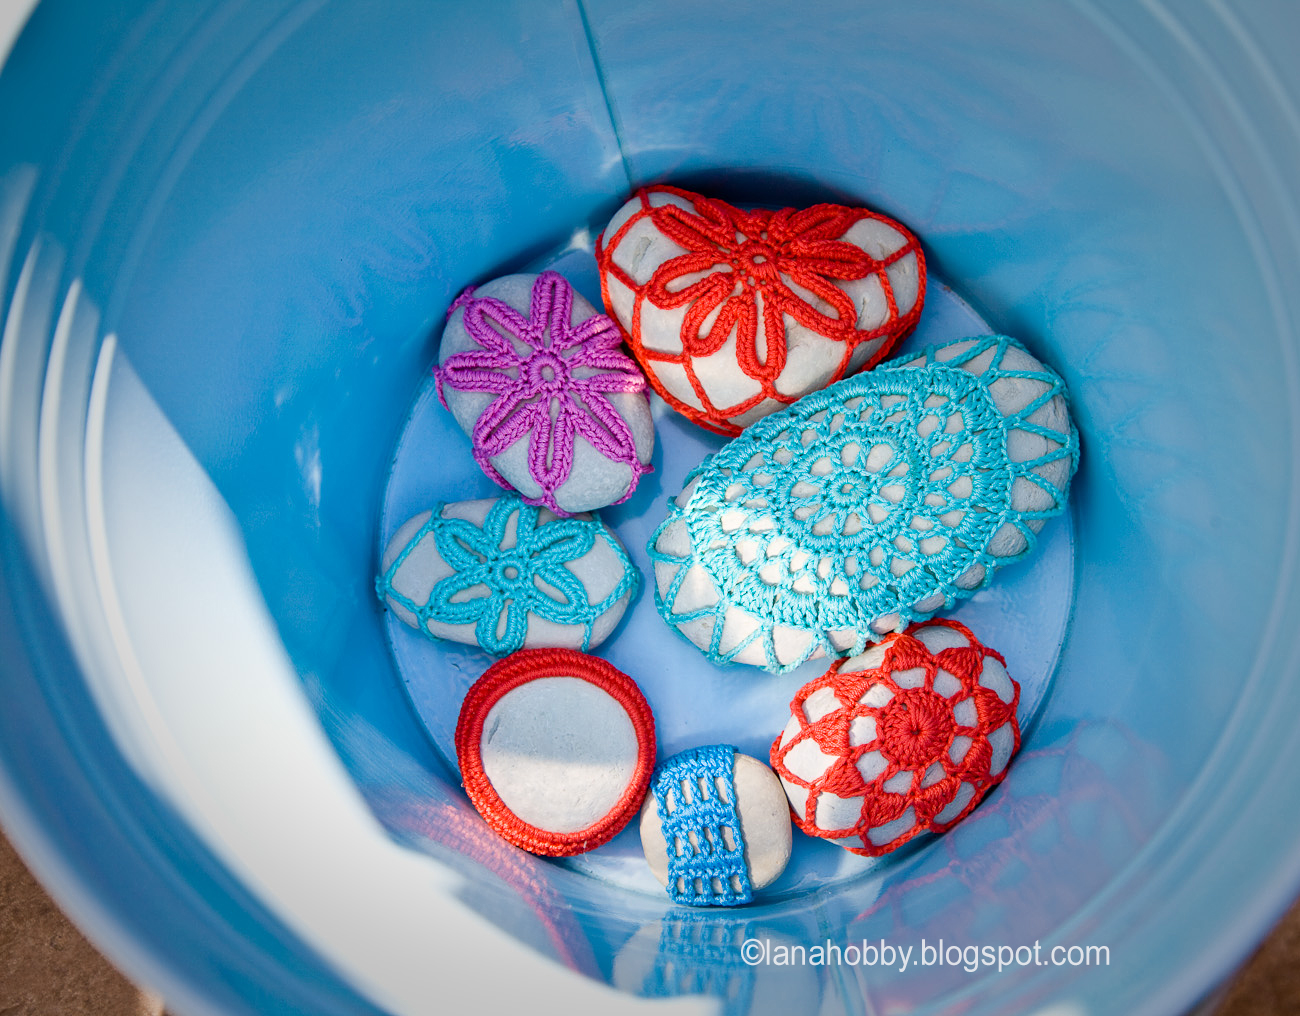
I discovered the crocheted stones only a few month ago, seeing some on Pinterest, and I knew at once I had to make some.
Some would say this is a crazy thing to make, and it sure did hurt making them , but I love the result, so it was all worth it.
Stones from the Mediterranean Sea, covered with crochet cotton threads, got a new look.
These stones will look amazing in your home and they are very easy to recreate!
I have a few super large:)
Some would say this is a crazy thing to make, and it sure did hurt making them , but I love the result, so it was all worth it.
Stones from the Mediterranean Sea, covered with crochet cotton threads, got a new look.
These stones will look amazing in your home and they are very easy to recreate!
I have a few super large:)
Friday
Crochet Ribbon and Beads Christmas Tree- Decorating Christmas Trees
I made a few adorable Christmas tree decorations using crochet ribbon this week.
The idea was inspired by video Youtube with complete step by step DIY tutorial. Very easy!
Crochet ribbon aprox. 30 – 40 cm
They would be a nice Christmas gift, Christmas tree decorations or simply to decorate the house.
This craft project is a simple way to get the Christmas feel in our home or office.
So here is my crochet Christmas tree
Have a look my Snowflake Pattern
Just click on image.
Decorated Christmas treeshere
Related with: decorating christmas trees, crochet christmas tree, decorate christmas tree, pattern crochet tree, how to decorate christmas tree .
The idea was inspired by video Youtube with complete step by step DIY tutorial. Very easy!
Crochet ribbon aprox. 30 – 40 cm
They would be a nice Christmas gift, Christmas tree decorations or simply to decorate the house.
This craft project is a simple way to get the Christmas feel in our home or office.
So here is my crochet Christmas tree
Have a look my Snowflake Pattern
Just click on image.
How to decorate a Christmas tree
Decorated Christmas treeshere
Related with: decorating christmas trees, crochet christmas tree, decorate christmas tree, pattern crochet tree, how to decorate christmas tree .
Thursday
Knitted jewelry: crochet necklace, boho stile
Sunday
Easy crochet flower appliquƩ tutorial
This crochet flower could also be used to decorate gifts, to spiff up some ready to wear clothing, and baby booties. Let me know all the ways you could use them!
I used sport weight yarn and a size H hook. This pattern will work with lots of other hook and thread combinations
Make a slip ring.
1st round: ch2, sc9 in ring=10 st total
2nd round : ch1, *( tr1,dtr2, trc1) in next sc, slip stitch in next sc; repeat from* 3 times more, (trc 1, dtr 2, trc 1) in next sc, sl st in ch 1= 5 petals.
Fasten off.

ch = chain
dtr = double treble crochet
sc = single crochet
st(s) = stitch(es)
sl st = slip stitch
trc = treble (triple) crochet
I used sport weight yarn and a size H hook. This pattern will work with lots of other hook and thread combinations
Make a slip ring.
1st round: ch2, sc9 in ring=10 st total
2nd round : ch1, *( tr1,dtr2, trc1) in next sc, slip stitch in next sc; repeat from* 3 times more, (trc 1, dtr 2, trc 1) in next sc, sl st in ch 1= 5 petals.
Fasten off.

ch = chain
dtr = double treble crochet
sc = single crochet
st(s) = stitch(es)
sl st = slip stitch
trc = treble (triple) crochet
Saturday
How to crochet a easy square

Ch 6. Join with a sl st to form a ring.
Round 1
Ch. 3, 2 dc, ch 2, (3 dc, ch 2) 3 times, sl st to join to the 3rd chain stitch from foundation loop.
Round 2
Work 3 sl sts (2 sl sts with the old color, and join the new color in the third) so that your crochet hook is adjacent to the space formed by the closest set of chain sts. Ch 3, 2 dc in space, ch 2 to form corner, 3 dc in same space, ch 2, (3 dc in next space, ch 2 to form corner, 3 dc in same space, ch 2) 3 times, sl st to join to the 3rd chain stitch you crocheted at the beginning of the round.
Round 3
Work 3 sl sts (2 sl sts with the old color, and join the new color in the third) so that your crochet hook is adjacent to the space formed by the closest set of chain sts. Ch 3, 2 dc in space, ch 2 to form corner, 3 dc in same space, ch 2, (3 dc in next space, ch 2, 3 dc in next space, ch 2 to form corner, 3 dc in same space, ch 2) 3 times, 3 dc in next space, ch 2, sl st to join to the 3rd chain stitch you crocheted at the beginning of the round.
Granny squares can be worked at any gauge.
Rounds 4 and Up
Abbreviations:
ch = chain, chs = chains, st = stitch, sts= stitches, sl st = slip stitch, dc = double crochet
My other Free patterns
http://lanahobby.blogspot.com/2009/08/knitting-stitches.html
Broomstick Lace Crochet.
Friday
Visor beanie free crochet pattern

This is an adult size large beanie for a head circumference of 22-23 inches.
100% Cotton rustic
1 hook size 5 mm
gauge
14 stitches and 12 rows = 4” (10cm) in half double crochet with size k/10 ½ - 6.50mm hook.
Instructions
either make an adjustable ring, or ch 4 and join with sl st to make a ring.
rnd 1: 8 hdc in ring join with sl st. ch 1 (counts as 1st hdc).
rnd 2: hdc in same st. 2 hdc in ea st around to last st, join with sl st to beginning chain. 16 hdc total.
ch 1.
rnd 3: hdc in same st. *hdc in next st, 2 hdc in next st*, repeat from * to * around to last st. join with sl st to beginning chain. 24 hdc total.
ch 1.
rnd 4: hdc in same st. *1 hdc in next 2 sts, 2 hdc in next st*, repeat from * to * around to last st.
join with sl st to beginning chain. 32 hdc total. ch 1.
rnd 5: hdc in same st. *1 hdc in next 3 sts, 2 hdc in next st*, repeat from * to * around to last st.
join with sl st to beginning chain. 40 hdc total. ch 1.
rnd 6: hdc in same st. *1 hdc in next 4 sts, 2 hdc in next st*, repeat from * to * around to last st.
join with sl st to beginning chain. 48 hdc total. ch 1.
rnd 7: hdc in same st. *1 hdc in next 5 sts, 2 hdc in next st*, repeat from * to * around to last st.
join with sl st to beginning chain. 56 hdc total. ch 1.
rnd 8: hdc in same st. *1 hdc in next 6 sts, 2 hdc in next st*, repeat from * to * around to last st.
join with sl st to beginning chain. 64 hdc total. ch 1.
rnd 9: hdc in same st. *1 hdc in next 7 sts, 2 hdc in next st*, repeat from * to * around to last st.
join with sl st to beginning chain. 72 hdc total. ch 1.
rnds 10 - 14: 1 hdc in each st. join with sl st to beginning chain. 72 hdc total.
rnd 15: 1 hdc in each st. join with sl st to beginning. fasten off. 72 hdc total.
rnd 16: Join contrasting color b, chain 1, 1 hdc in each st around. join with sl st to beginning chain. 72 hdc total.
rnd 17: chain 1, 1 hdc in each st around. join with sl st to beginning chain. 72 hdc total.
rnd 18: chain 1, 1 hdc in each st around. join with sl st to beginning chain. fasten off. 72 hdc total.
rnd 19: Join color a, chain 1, 1 hdc in each st around. join with sl st to beginning chain. 72 hdc total.
BRIM
Note: the brim will begin turning under on Row 19. It will fold under and be sewed down on the underside of the brim. It will not be completely straight across on the underside, don't worry about that, it will still look alright from the outside.
ROW 1 - Ch 1 and 1 sc in first sc, 1 sc in next 39 sc, ch 1 and turn. (40 sc)
ROW 2 - 1 sc in each sc to end of row, ch 1 and turn. (40 sc)
ROWS 3 to 12 - Repeat Row 2.
ROW 13 - (1 sc in next 4 sc, 2 sc tog) 6 times, 1 sc in last 4 sc, ch 1 and turn. (34 sc)
ROW 14 - (1 sc in next 2 sc, 2 sc tog) 8 times, 1 sc in next 2 sc, ch 1, turn. (26 sc)
ROW 15 - (1 sc in next 3 sc, 2 sc tog) 5 times, 1 sc in last sc, ch 1, turn. (21 sc)
ROW 16 - 1 sc in next 2 sc, 2 sc tog, (1 sc in next 3 sc, 2 sc tog) 3 times, 1 sc in next 2 sc, ch 1, turn. (17 sc)
ROW 17 - 1 sc in next sc, 2 sc tog, (1 sc in next 4 sc, 2 sc tog) twice, 1 sc in last 2 sc, ch 1, turn. (14 sc)
ROW 18 - (1 sc in next 2 sc, 2 sc tog) 3 times, 1 sc in last 2 sc, ch 1, turn. (11 sc)
ROW 19 - (1 sc in next 1 sc, 2 sc tog) 3 times, 1 sc in last 2 sc, ch 1 turn. (8 sc)
ROW 20 - 2 sc tog four times, ch 1, turn. (4 sc)
ROW 21 - 2 sc tog twice, fasten off.
Sew the underside of the brim into place.
Edging: Do a backward SC in each stitch around.
Featured stitches:
chain (ch)
slip stitch (sl st)
single crochet (sc)
double crochet (dc)
Fasten off.
Finish off.
Email me if you find any mistakes in the pattern
Saturday
Subscribe to:
Posts
(
Atom
)